

Git for beginners
The save and undo button for your codebase.

Git is crucial for every developer to use no matter what field you are in for your personal projects and collaborative projects. To set the record straight, Git & GitHub are two different things. Git acts as a manager for your code, while GitHub acts as a storage space for all your codes managed by Git. I will be using GitHub in the examples below, so it is good to understand a little of what GitHub is!
View my article: GitHub For Beginners
Article Overview
- What is Git?
- Downloading Git
- Basics of Git
- Basic Commands of Git
- Resources & References
- Conclusion
What is Git?
Git is a free and Open Source Distributed Version Control System.
Open-source means software where the source code is made freely available and may be redistributed and modified. Developers can contribute to Git's codebase!
A distributed version control system (DVCS) is a type of version control where the complete codebase (including its version histories) is mirrored on every developer's computer.
Downloading Git
- Download Git here!
- Open up your terminal or command prompt and type:
git config --global user.name "Your Name"
git config --global user.email "email@example.com"
Read about how to set up Git for the first time here!
- Next, when you type in
git config --list, you should see:user.name=YourName user.email=email@example.com
Basics of Git
Track files
The version control process starts by tracking the files and folders in the application/repository(your project's code). Tracking commences with the initial state of the application and starts tracking all of your changes. Usually, this is done as soon as the application is created.
Make commits
Think of commits as saving your codes. When there are any changes to your code or new folders/files are created, we can choose to add the new files/folder to be tracked as well. Once you're happy with the changes, you can make a commit for your code. A helpful message is included in each commit that is written by you or other devs. This message helps to summarize the changes made in that specific commit. Every time you commit, it exactly saves how your code looks like.
It will be great to follow conventional commits like
feat:andfix:, orfeat!:andfix!:which is a breaking change.
Commit history
When the code base grows, there will be multiple commits. This will form a commit history where all the past commits can be seen. If any of your changes break the app, you can always revert back to a specific commit that you want.
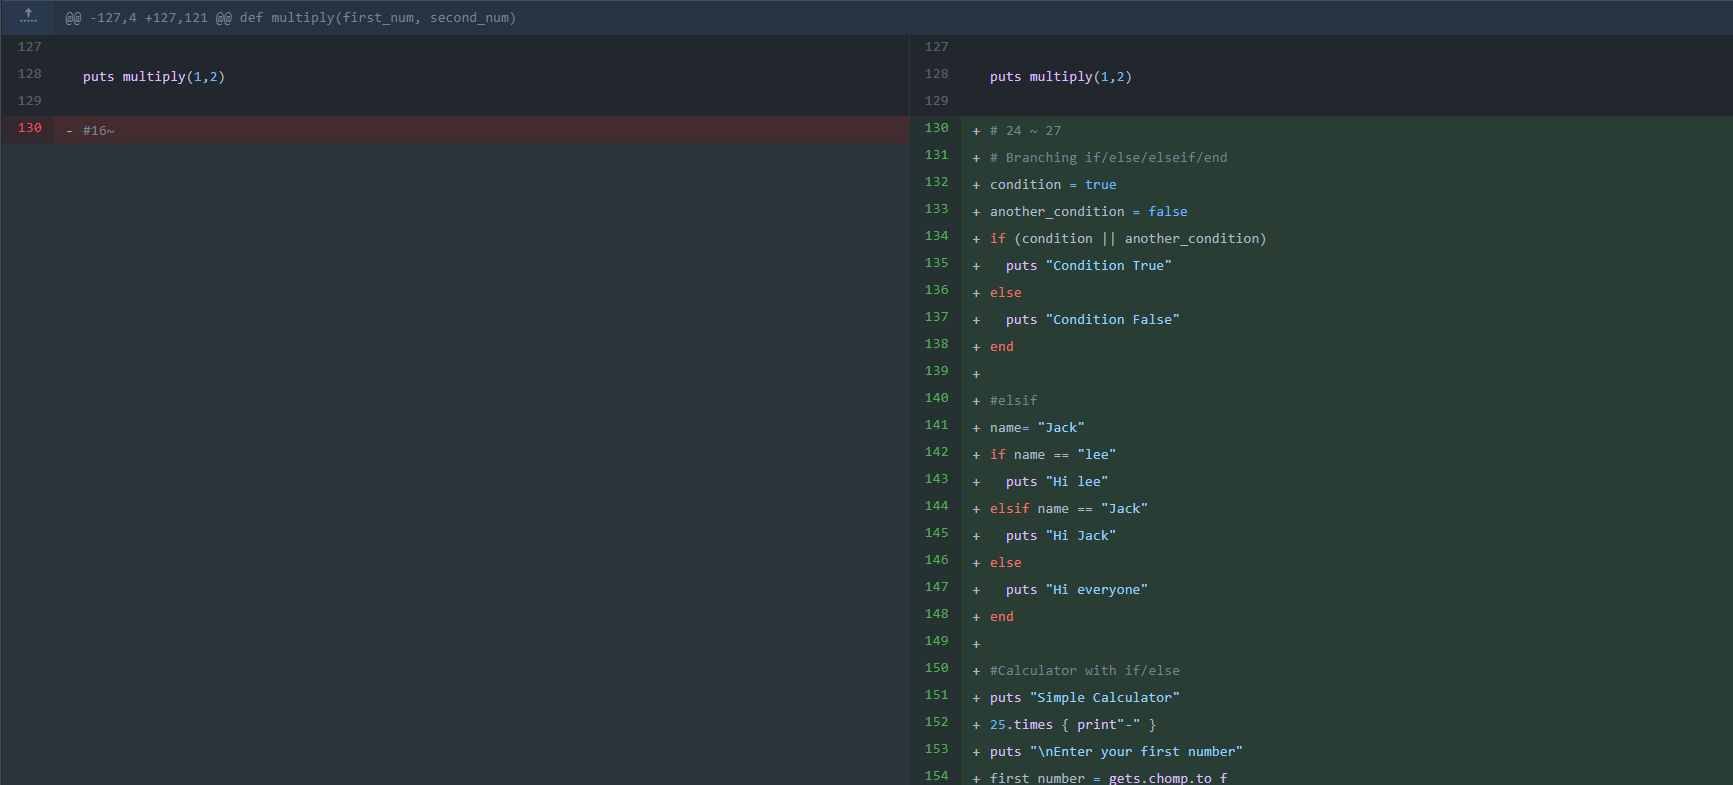
This is an image from a GitHub repository of mine with multiple commits. If needed, I can always revert to a specific commit.
And if I press on any commits, I can view the code I added in green or deleted in red.
Treat it like snapshots of your code at a different time. Git is simply the time travel machine for you to go back in time for a specific code version.
Basic Commands of Git
Now that you are settled with the basics, it is time to get familiar with the basic commands of Git! I will be showing it in the commands, explanations, and how to use it in the terminal. I will split the basic commands into working with local and remote repositories.
git config
Two important configurations are your username and email. These configurations set what email address and name commits will be from a local computer. A --global flag is used to set the configurations to all repositories on a computer. Without a --global, the configurations will only apply to the current working directory.
# Running git config globally
$ git config --global user.email "myName@emailaddress.com"
$ git config --global user.name "Your Name Here"

# Running git config on the current repository settings:
$ git config user.email "myName@emailaddress.com"
$ git config user.name "Your Name Here"
git init
This command turns a directory into an empty Git repository. This is the first step in creating a repository. After running this, making changes then commit is doable.
# First, you will need to be in your project's folder.
#Type `pwd` (Present Working Directory) to view your current folder path.
$ pwd

# For example, I want to start an empty Git repository in the Project-1 folder.
# To be able to commit all files that are in this project, the path should end with /Project-1.
# To Change directory, use cd.
$ cd /Users/computer-name/Folder-name/Project-1

# To list all files/folders in your current directory use:
$ ls
#or (list hidden files too such as .git).
$ ls --a

# When you are in the right directory, use:
$ git init

#Now when u type:
$ ls --a
# You should be able to see .git
git add
Adds files to the staging area for Git. The file has to be in the staging area before committing to a repository. There are a few different ways to use git add, the basic ones are adding all files/folders or specific files/folders. Basically, you have to add files into the staging area after making changes, and you are ready to commit all the changes.
# To add all files that are not staged, use:
$ git add .
# The dot means all.

# To stage a specific file, use:
$ git add filename
# For example:
$ git add index.html
git commit
Treat this like saving your changes. You can record the changes made to the files/folders to a local repository. Every commit has a unique ID for easy reference in the future.
It is recommended to add a message to understand what has been changed in that specific commit. Add a commit for the changes of one task done. It is best to avoid having many changes done for different functions and cluttered them into one commit.
# Adding a commit with a message, use:
$ git commit -m "This is the message"
git status
git status returns the current state of the repository. It will show which files are in the staging area but not committed. If there are no changes in the current branch, it will return "working directory clean"
#Output when files/folders have not been staged(have not used git add)
$ git status
On branch TestBranch
Untracked files:
  (use "git add <file>..." to include in what will be committed)

      Project-1/index.html
#Output when files have not been committed (have not used git commit)
$ git status
On branch TestBranch
Your branch is up-to-date with 'origin/TestBranch'.
Changes to be committed:
  (use "git reset HEAD <file>..." to unstage)

        new file:   Project-1/index.html
#Output when all files are staged and committed ( git add . then git commit)
$ git status
On branch TestBranch
nothing to commit, working directory clean
git branch
To check which are you working on, add a new branch, or delete a branch.
# Create a new branch
$ git branch <branch_name>

# List all remote or local branches. The branch with * in front is your working branch.
$ git branch -a

# Delete a branch
$ git branch -d <branch_name>
git checkout or git switch
To start working in a different branch, use git checkout or git switch to switch among branches. Read about the differences between git checkout and git switch here.
# Checkout/switch an existing branch
$ git checkout <branch_name>
# Or
$ git switch <branch_name>

# Checkout and create a new branch with that name
$ git checkout -b <new_branch>
# Or
$ git switch -c <new_branch>
git merge
Combines the changes from one branch to another branch. For example, merge the changes made in a staging branch into the stable branch.
# Merge changes into the current branch from another branch
$ git merge <another_branch_name>
Working with remote repositories
git clone
To copy an existing remote repository(from GitHub) to your local repository, use git clone . This will clone everything in the branch (default is the main branch) including its git repository history.
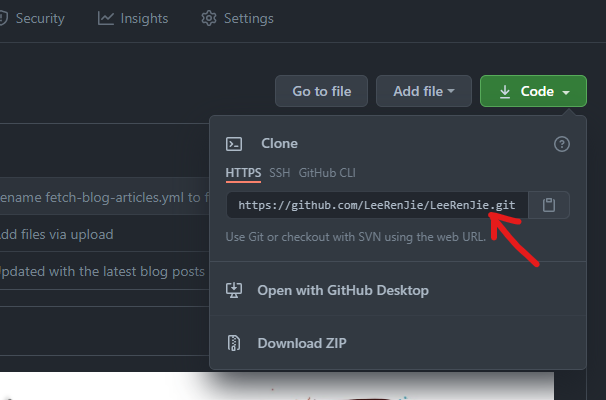
# Get the remote URL from the image above
$ git clone <remote_URL>
git remote
To connect a local repository with a remote repository (GitHub).
# Add the remote repository as the origin.
# Usually, this will be your personal repo/forked repo from others.
$ git remote add origin <remote_URL>

# Add the remote repository as the upstream.
# Normally, this will be someone else's repo for you to fetch all updates and merge them into your local repo. If many peoples contribute to a project(including you), you will want to make sure the cloned repo(local repo) is up to date. You can then make changes on top of the existing code.

$ git remote add upstream <remote_URL>

# List named remote repositories.
#You will be able to see the remote URL of origin/upstream for you to fetch/push
$ git remote -v
git pull
To get the latest version of a repository run git pull. This pulls the changes from the remote repository to the local computer.
$ git pull <branch_name> <remote_URL>
# Example:
$ git pull new-feature <remote_URL>
In Practice:
git push
Sends local commits to the remote repository. git push requires two parameters: the remote repository and the branch that the push is for.
$ git push <remote_URL/remote_name> <branch>

# Push all local branches to the remote repository
$ git push —all
# If you have more than one branch and hope to push all the branches to GitHub.

# Push a specific branch to the remote repository with a named remote
$ git push origin newFeatures
# You are pushing all your changes to the origin(Your repo in GitHub) with the branch newFeatures.
# If newFeatures branch exists, it will add on as a commit. If it does not exist, it will create a new branch called NewFeatures
git rm
Remove files or directories from the staging area. There are two options, force and cached. Command with force deletes the file, while cached removes the file from the staging area. When removing an entire directory, a recursive command is required.
# To remove a file from the staging area (cached):
$ git rm --cached <file name>

# To delete a file (force):
$ git rm -f <file name>

# To remove an entire directory from the working index (cached):
$ git rm -r --cached <directory name>

# To delete an entire directory (force):
$ git rm -r -f <file name>
git log
To show the commit history for the repository. This is a great way to see the changes made recently, in a specific time frame, or by Author.
# Show entire git log
$ git log

# Show git log with date pameters
$ git log --<after/before/since/until>=<date>
# Example:
$ git log --before="Nov 30"

# Show git log based on commit author
$ git log --<author>="Author Name"
# Example:
$ git log --author="Lee Ren Jie"
Resources & References
- Pro Git ebook for free
- More about Git
- Git's Official Documentations
- Git Cheatsheets
- Atlassian, Git Basics
From Youtube
- Programming With Mosh, Learn Git in One hour
- Traversy Media, Git & GitHub Crash Course for Beginners
- FreeCodeCamp.org, Git & GitHub for beginners - Crash Course
- Colt Steele, Learn Git in 15 minutes
Conclusion
These are some basics you need to get started working with git repositories locally or remotely. There are more commands to this, and it is crucial to learn some of the advanced commands. Don't worry if you make mistakes, trial and error will grant you a smoother experience using git. Understanding different workflows for different projects are important too. Start learning Git and use it today!
Day one, not one day.
Thank you for Reading😄
I hope you have gained a general understanding of what Git is and how it generally works! If you like my content, be sure to follow me and subscribe to my newsletter! Boost this article by leaving a reaction to support me!
That's all from me now! Have a great day/night.


